This article describes and shows how to use the time limit feature with automatic hand in. Follow the instructions below to use the feature.
Activate time limit with automatic hand in on an exam
1. Go to the exam in your library that you wish to time limit or create a new exam. Under the heading Time limit, choose On and set the time limit the students will have to finish the exam for in hours and/or minutes (figure 1). Don't forget to save the exam after setting the time limit if you are editing an existing exam.
When you save the exam, the time limit will be a part of the exam when it is started. If a student needs more time before the start of the test, this must be changed in the accessibility settings that can be accessed under the column Students, search for the name and change the allow extended time for exams with time limit.
The exam timer starts counting down individually for each student from when they start the exam.
For example: If an exam has a time limit of 30 minutes and student 1 starts the exam at 10:00 AM the exam will be automatically handed in at 10:30 AM. If student 2 starts the same exam at 10:03 AM the exam will be automatically handed in at 10:33 AM.
Figure 1
2. You can allow extended time or fully remove the time limit for selected students. To do this you click on Students in the left-hand menu, search for the student in the search field and choose the student you wish to edit the time limit settings for.
Now check the Allow extended time for exams with time limit box, and you will be able to either remove the time limit fully or extend the time this student has during time limit exams by a certain percent (figure 2).
Note: The changes made here are saved for this particular student until changed again in this view. The changes will take effect on exams in your whole school/organisation for this student, not only for a single teachers exams.
Figure 2
Start exam with time limit
1. When it is time to start the exam your predefined settings will be automatically shown in the start exam box. You can now choose to use the predefined settings or change the time limit for this specific exam instance you are starting (figure 3).
Note: If you do not have the time limit feature activated on your exam before it is started the heading Time limit will not be present in the start exam box.
Figure 3
2. When the exam is started you will see the time limit in the settings information box that you can find near the top of the ongoing exams monitoring view (figure 4).
Figure 4
The time limit feature from a student perspective
1. Students can see the total time they have to finish the exam in the Exam information that can be selected from the left-hand question menu. The total time limit is always shown here where it says Time limit: (figure 5).
The student can also see how much time is left in the top menu (figure 5) and can choose if the time should be visible or not by clicking on the timer (figure 6).
Figure 5
Figure 6
2. An information box that shows how much time is left will appear automatically when it is 30 min, 5 min and 1 min left until the time limit is reached and automatic hand in occurs (figure 7).
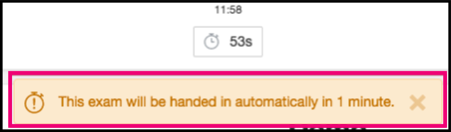
Figure 7
Add more time or remove time limit for a student during the exam
Add more time via a USB device
During the ongoing exam it is possible to add more time manually or remove the time limit fully for students. This is done by asking the student to click on the cog wheel in the top-left corner of the Digiexam client where the exam is written. This will open the accessibility settings for this student's exam. When the Accessibility settings box is open, insert a USB device with the exam offline file on it. You will be able to access the settings to add more time or remove the time limit fully (figure 8).

Figure 8
If the exam is still ongoing, and the student is eligible to receive more time, it is possible to add time and reopen the exam for the student while the Exam has ended box (figure 10) is open. To do this, insert a USB device with the exam offline file on it. This will give you access to the time settings for the exam and the possibility to add more time or remove the time limit fully (figure 9).
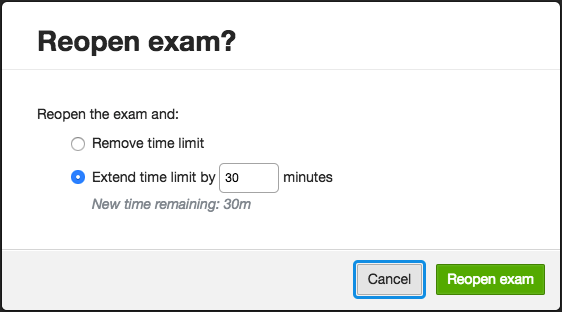
Figure 9
Add more time via the student profile
Enter a student's profile by clicking on the student for whom the time limit is to be extended in the monitoring view, or search for the student in the student search.
Check Allow extended time for exams with time limit and choose to remove or extend the exam time limit. Then click on Save and ask the student to hand in the exam and then start it again. When the exam is started again, the new settings will apply for extended exam time.
When the time is up
If the time limit is reached before the student hands in the exam manually an information box will appear which informs the student that the exam has ended and has now been handed in (figure 10).
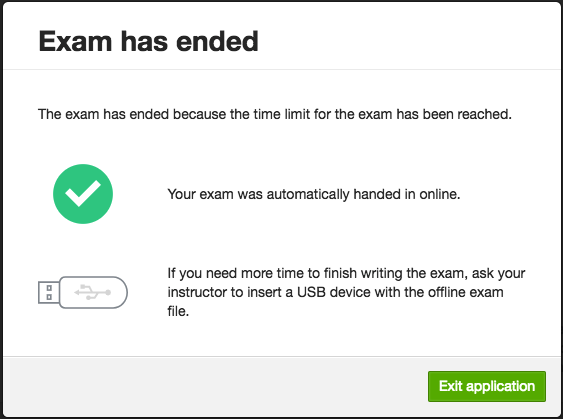
Figure 10
Comments